
Filament Drying
Filament absorbs moisture from the air. During printing, this moisture rapidly vaporizes inside the hot nozzle, causing the molten filament to expand, extrude erratically, and form bubbles, which leads to stringing, oozing, holes, rough surfaces, and reduced strength. These issues become more pronounced as ambient humidity rises or the filament’s exposure time lengthens.
Therefore, before starting a print—especially for models demanding high appearance and quality—if the filament’s storage condition is uncertain, it is recommended to dry it first. For daily storage, always keep it sealed and protected against moisture.
The image below shows moisture-affected (left) and dry (right) translucent PETG.
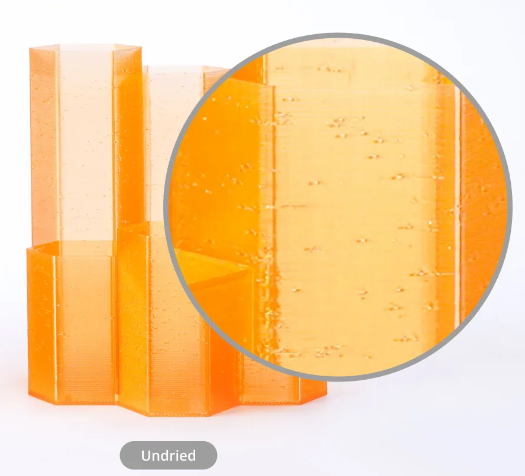
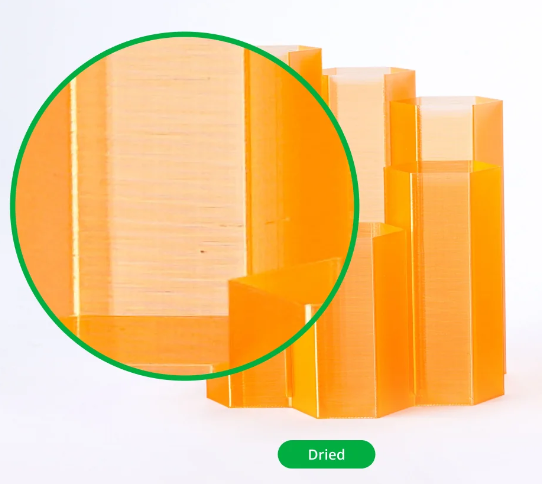
The drying methods are as follows, as shown in the images below:

1. Drying with AMS 2 Pro / AMS HT
1.1 Drying Procedure
Insert the filament → Select the filament type → Start drying → Drying completed

Notes:
AMS cannot perform drying while the auto-feeding function is running, in order to prevent the filament from being deformed by the gears during the drying process.
1.2 Notes for AMS 2 Pro and AMS HT
| AMS 2 Pro | AMS HT | |
|---|---|---|
| Applicable Filaments | – Suitable for filaments requiring drying temperatures no higher than 65 °C; – Some filaments require temperatures above 65 °C, and AMS 2 Pro may not fully dry them. – When drying high-temperature filament, you need to take out the low-temperature filament. For example, when drying ABS, PLA filament cannot be placed in the AMS. | – All filaments can be dried using the AMS HT; – Some materials that require high-temperature drying may still not be fully dried, such as PVA, PPS-CF, PPA-CF. |
| Power Requirements | – The H2D printer supports powering one AMS 2 Pro for drying directly from the printer; – When multiple AMS 2 Pro units are drying simultaneously, the additional units must be powered using their AMS power adapters; – If an AMS 2 Pro is connected to an X / P series printer, every unit must use a power adapter to enable the drying function. | – Must be powered independently using the included power cable (the printer cannot supply power for AMS HT drying). |
1.3 Drying Modes Explanation

Notes:
When switching to the rotation drying mode, you need to manually pull the filament out from the inlet and place it on the side of the spool.
The static drying mode is not suitable for the following filaments: PLA, PVA, Support for PLA/PETG, and TPU.
The reason is that these filaments have low softening temperatures. When left static during drying, the filament layers may stick together or deform due to expansion.
1.4 Printing While Drying
To ensure a stable feeding process and print quality, the drying temperature is automatically lowered after a print job starts, usually below the filament’s softening point, to prevent clogging in the AMS.
When drying PLA while printing with another filament or printing with PLA, the drying temperature is set to 45 °C;
when drying PETG while printing ABS or printing with PETG, it is set to 55 °C.

2. Drying Filament Using the Printer’s Heated Bed
Notes:
Please carefully follow the instructions and precautions below to avoid equipment damage. During filament drying, the following risks may occur—be sure to check before starting:
Some third-party spools may not be heat-resistant enough and could deform during drying.
P1P / A1 / A1 mini , as open-frame printers, cannot be used to dry filament.
To make filament drying more convenient for users, we use the following two printer features to create a suitable drying environment:
The heated bed’s warming function
The printer’s enclosed chamber

2.1 Heated Bed Drying Steps for H Series / X Series / X2D / P2S Printers
Step 1: Unload Filament & Check for Interference
Clear the upper and lower areas of the build plate to prevent collisions during movement.
Unload the filament from the toolhead to avoid filament softening inside the extruder, which may lead to clogging.

Step 2: Prepare for Drying & Lower the Heated Bed
Screen operation tips are shown in the figure below: (Taking the H2 series as an example)

Click “Prepare” to move the toolhead and build plate to the preset positions.

Step 3: Cover the Filament to Maintain a High-Temperature Environment
Place the filament on the build plate and cover it with a lid printed from high-temperature materials such as PA-CF or PC.
You can download the model from: Bambu Filament Drying Cover
A packaging box can also be used as an alternative cover.

Step 4: Start Drying & Flip the Spool Midway
Select the filament type, set the bed temperature and drying duration, then click “Start” to begin drying.

Note:
It is recommended to flip the spool midway through drying to ensure even heating.
Wear gloves when flipping the spool to avoid burns!
Step 5: Finish Drying & Store the Filament
After the drying time is complete, set the heated bed temperature to 0 °C, and wait until the spool is no longer hot to the touch before removing it.
Once drying is finished, immediately store moisture-sensitive filaments in a sealed container or AMS with effective desiccants, and use them as soon as possible to prevent the filament from absorbing moisture again.

2.2 Notes for Drying on P1S
The P1S requires manual control of the bed lowering and bed temperature settings. You may refer to Appendix 1 for the recommended drying temperature and duration for each filament type. The main steps are as follows:
Step 1: Unload Filament & Check for Interference

Step 2: Home the Printer & Lower the Build Plate
Use the Home function on the printer screen and wait for the bed to finish homing:


 Select the heated bed and lower it |  Lower the bed to the bottom position |
Step 3: Cover the Filament to Maintain a High-Temperature Environment

Step 4: Set Bed Temperature & Start Drying Timer
Since the P1S does not have a built-in “Filament Drying” feature, you must manually set the required bed temperature and track the drying time yourself.
Using ABS as an example, set the bed temperature to 100 °C, then manually record the start time.
Tip:
You can check the recommended drying temperature & duration for each filament in Appendix I.
Step 5: Finish Drying & Store in a Sealed Environment
After the drying time is reached, set the bed temperature to 0 °C, wait until the filament is no longer hot to the touch, and then remove it promptly.
After drying, immediately store the filament with effective desiccants in a sealed container or AMS. Use it as soon as possible to prevent moisture absorption.

Appendix I: Recommended Drying Parameters for Each Filament Type
The recommended drying settings for various types of filament are shown in the following table:
Note:
If you purchased spool-less filament, please mount it onto a reusable spool before drying.
You can refer to this wiki guide:
Installing Spool-less Filament onto a Reusable Spool.
| Filament | Drying Requirement Before Use | Desiccant Protection During Use | Forced-Air Oven Temp / ℃ | Drying Time / h | BambuLab H Series / X Series / P2S / X2D / P1S Bed Temp / ℃ | Drying Time / h | Flip Interval / h | Cover |
|---|---|---|---|---|---|---|---|---|
| PLA Basic/PLA Matte | Recommended | Not required but recommended | 50 | 8 | 60-70 | 12 | Every 6 hours | Filament box or PC cover |
| PLA Silk+ | Recommended | Not required but recommended | 55 | 8 | 70 | 12 | Every 6 hours | Filament box or PC cover |
| PLA-CF/GF | Recommended | Not required but recommended | 50-60 | 8 | 65-75 | 12 | – | – |
| PLA Wood | Required | Required | 55-65 | 8 | 70-75 | 12 | – | – |
| PLA Aero | Recommended | Not required but recommended | 55 | 8 | 60-70 | 12 | – | – |
| PLA Galaxy | Recommended | Recommended | 55 °C | 8 | 65 – 75 °C | 12 | – | – |
| Support for PLA、Support for PLA/PETG | Recommended | Not required but recommended | 50-60 | 8 | 65-75 | 12 | – | – |
| PETG、PETG-CF | Recommended | Not required but recommended | 60-65 | 8 | 75-85 | 12 | – | – |
| ABS、ASA | Recommended | Not required but recommended | 75-85 | 8 | 90-100 | 12 | – | – |
| ASA Aero | Recommended | Not required but recommended | 80 | 8 | 90-100 | 12 | – | – |
| TPU | Required | Required | 65-75 | 8 | 80-90 | 12 | – | – |
| PC | Required | Required | 75-85 | 8 | 90-100 | 12 | – | – |
| PVA、BVOH | Required | Required | 75-85 | 8-12 | 90-100 | 12 | – | – |
| Support for PA/PET | Required | Required | 75-85 | 8-12 | 90-100 | 12 | – | – |
| PA、PA-CF/GF、PAHT-CF/GF、PET-CF, etc. | Required | Required | 75-85 | 8-12 | 90-100 | 12 | – | – |
| PPA-CF/GF | Required | Required | 100-140 | 8-12 | 110-120(maximum) Less effective than an oven | 10-12 Less effective than an oven | – | – |
| PPS、PPS-CF/GF | Required | Required | 100-140 | 8-12 | 110-120(maximum) Less effective than an oven | 10-12 Less effective than an oven | – | – |
| Support for ABS | Less effective than an oven | Less effective than an oven | 80 | 4 | 85-95 | 6 | Every 3 hours | – |
📂 Click to view more: Appendix II and Appendix III.
Appendix II: Filament Drying Precautions and Storage Humidity Requirements
Drying Precautions
(1) When drying filaments using an oven, it is recommended to use a forced-air convection oven. The oven chamber should not be too small, and the filament spool should be placed away from the heating elements to ensure uniform temperature distribution. This helps the filament dry evenly and prevents deformation or damage to the spool or filament due to localized overheating.
The recommended flat dimensions of our reusable spool are: 200 mm outer diameter, 67 mm height. Therefore, the oven’s internal dimensions should be at least 250 mm deep, 250 mm wide, and 90 mm high for drying one spool.
If drying multiple spools at the same time, increase the oven height accordingly.
Do not use a microwave oven or a kitchen oven to dry filaments. Microwave heating is uneven and temperature cannot be controlled; kitchen ovens have very uneven heat distribution, and areas near the heating tubes/plates can become extremely hot and easily damage the spool or filament.
(2) PA-based filaments (PA, PA-CF/GF, PAHT-CF/GF, PPA-CF/GF, etc.) absorb a significant amount of moisture when exposed to open air for around 3 months. After this level of moisture absorption, it becomes very difficult to dry them using a conventional convection oven at 80–90 °C (which is within the spool’s maximum heat-resistance temperature).
Therefore, if the filament will not be used for a long period, it must be protected with desiccants and stored in a sealed container.
(3) PC filament may become brittle after repeated “heating–cooling” drying cycles due to accumulated thermal stress. Although this does not affect the printed part’s mechanical properties, it increases the risk of filament breakage during printing.
To avoid this, after a PC spool has been dried, keep it sealed with desiccants throughout subsequent printing and storage. When taken out for the next print, if it has been well-protected, it may not need drying or only a short drying period, reducing unnecessary drying cycles and lowering the risk of brittleness.
(4) When drying filament using X1 or X1C printers, the spool must be covered with the filament’s cardboard box or a printed PC cover. Keep the top cover closed and front door tightly shut during the entire drying process to maintain a high-temperature environment around the spool.
Additionally, the spool must be flipped midway through drying to ensure even heating.
Storage Humidity Requirements
After drying the filament, it must be stored in a sealed container or AMS with desiccants during use to prevent it from absorbing moisture again. A hygrometer can be used to monitor the actual humidity level.
The relative humidity of typical indoor open air is usually 45%~65% RH, and can be even higher during humid weather. Most filaments can only remain dry for a certain period when stored in an environment below 20% RH. The lower the humidity, the longer the filament can stay dry.
In a 20% RH dry environment, filaments with different moisture absorption levels can generally remain dry for 2~7 days.
In a typical indoor environment of around 55% RH, freshly dried filaments will usually absorb enough moisture to affect print quality within 2~12 hours, depending on how hygroscopic the filament type is.

Relative humidity in a typical indoor environment

Relative humidity in humid air

Protecting filament with desiccants and a sealed container

Monitoring humidity inside the sealed box with a hygrometer
Appendix III: Desiccant Instructions
Quoted from:
AMS Desiccant Guide
Desiccant for AMS Unit
New silica-gel desiccant packaging
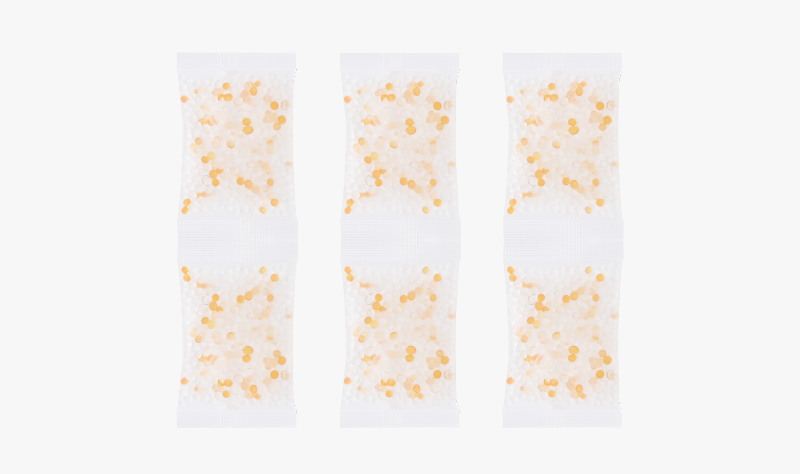
Purchase links:
Desiccant Status
When the desiccant has absorbed sufficient moisture, the yellow indicator beads inside will gradually turn green (as shown on the right). If the entire pack appears dark green, it should be replaced with a new one or regenerated by drying.
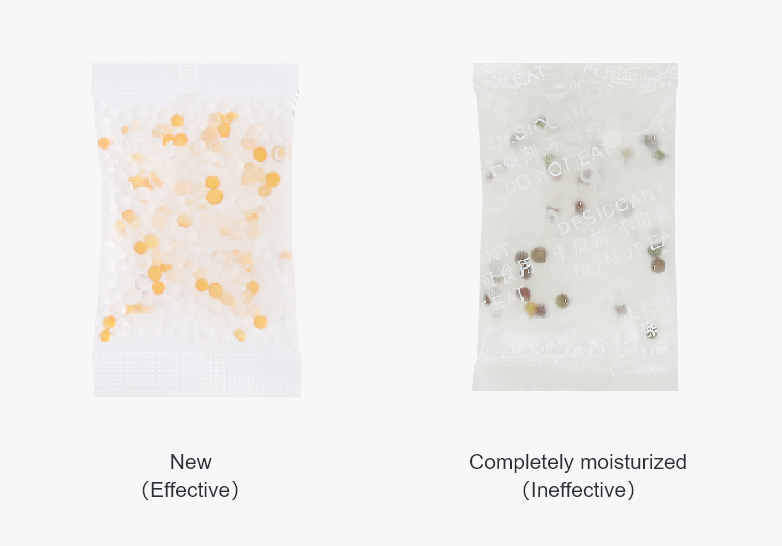
Note::
Before placing the desiccant into the AMS, please remove it from the sealed transparent plastic bag.
For routine maintenance, refer to the Desiccant Replacement Guide.
How to Dry Silica-Gel Desiccants?
Safety Warning::
Do not exceed a drying temperature of 100°C, as overheating may damage the silica-gel structure. Ensure proper ventilation and wear heat-resistant gloves during operation. Use heat-safe containers such as ceramic, glass, or aluminum foil (plastic containers are prohibited). If using a household oven, thoroughly clean it after drying. Keep children and pets away from the high-temperature area during the process.
I. Drying with a Household Oven
Steps:
Pre-treatment: Remove the moisture-absorbed silica-gel desiccant from the AMS and take it out of its plastic outer bag.
Spread Evenly:Distribute the beads evenly on a heat-resistant container (such as a ceramic plate, aluminum foil, or glass beaker) with a thickness of ≤ 2 cm.
Set Temperature:Adjust the oven to 80-90℃ (Do not exceed 100°C to avoid damaging the silica-gel structure.)
Drying Duration:
Lightly damp(light purple): 1–2 hours
Fully saturated(dark purple): 2-3 hours
Cooling and Inspection::Let the beads cool down after drying. Once they return to orange, they can be reused.
Note:
Avoid using cookware that is also used for food. A dedicated tray is recommended.
II. Drying with a 3D Printer
Supported Models:Bambu Lab X1, X1C, and P1S.
Steps:
Preheat the Heatbed:Set the heatbed temperature to 80 °C via the printer screen or Bambu Handy, and preheat for 10 minutes.
Place the Desiccant:Put the silica-gel beads into a heat-resistant container, keep the lid open, and place it on the build plate.
Drying Duration:3-4 hours (longer than an oven due to lower heating power).You may stir or flip the beads every 30 minutes for more even drying.
Check the Status:Confirm that the desiccant has returned to orange in color.
Advantages:
No additional equipment required, suitable for users without an oven.
Can dry both filaments and desiccants at the same time.
III. Post-Drying Handling
Usage Tips:
- After drying, place the silica-gel beads into a suitable gauze bag or breathable pouch before putting them back into the AMS.
Storage Tips:
- If you do not plan to use the desiccant immediately, place it into an airtight bag right after drying to prevent moisture absorption.
Service Life:
- Silica-gel desiccants can typically be regenerated 5–15 times.
Replace them if color change becomes slow or if the beads begin to crack.
AMS Calcium Chloride Desiccant
Note:Since calcium chloride may liquefy after absorbing moisture and cause potential corrosion risks to electronic components, the latest AMS, AMS 2 Pro, and AMS HT have discontinued the use of calcium chloride desiccants. All units now come with the silica gel desiccant mentioned above.
Old calcium chloride desiccant package (with outer wrapper)
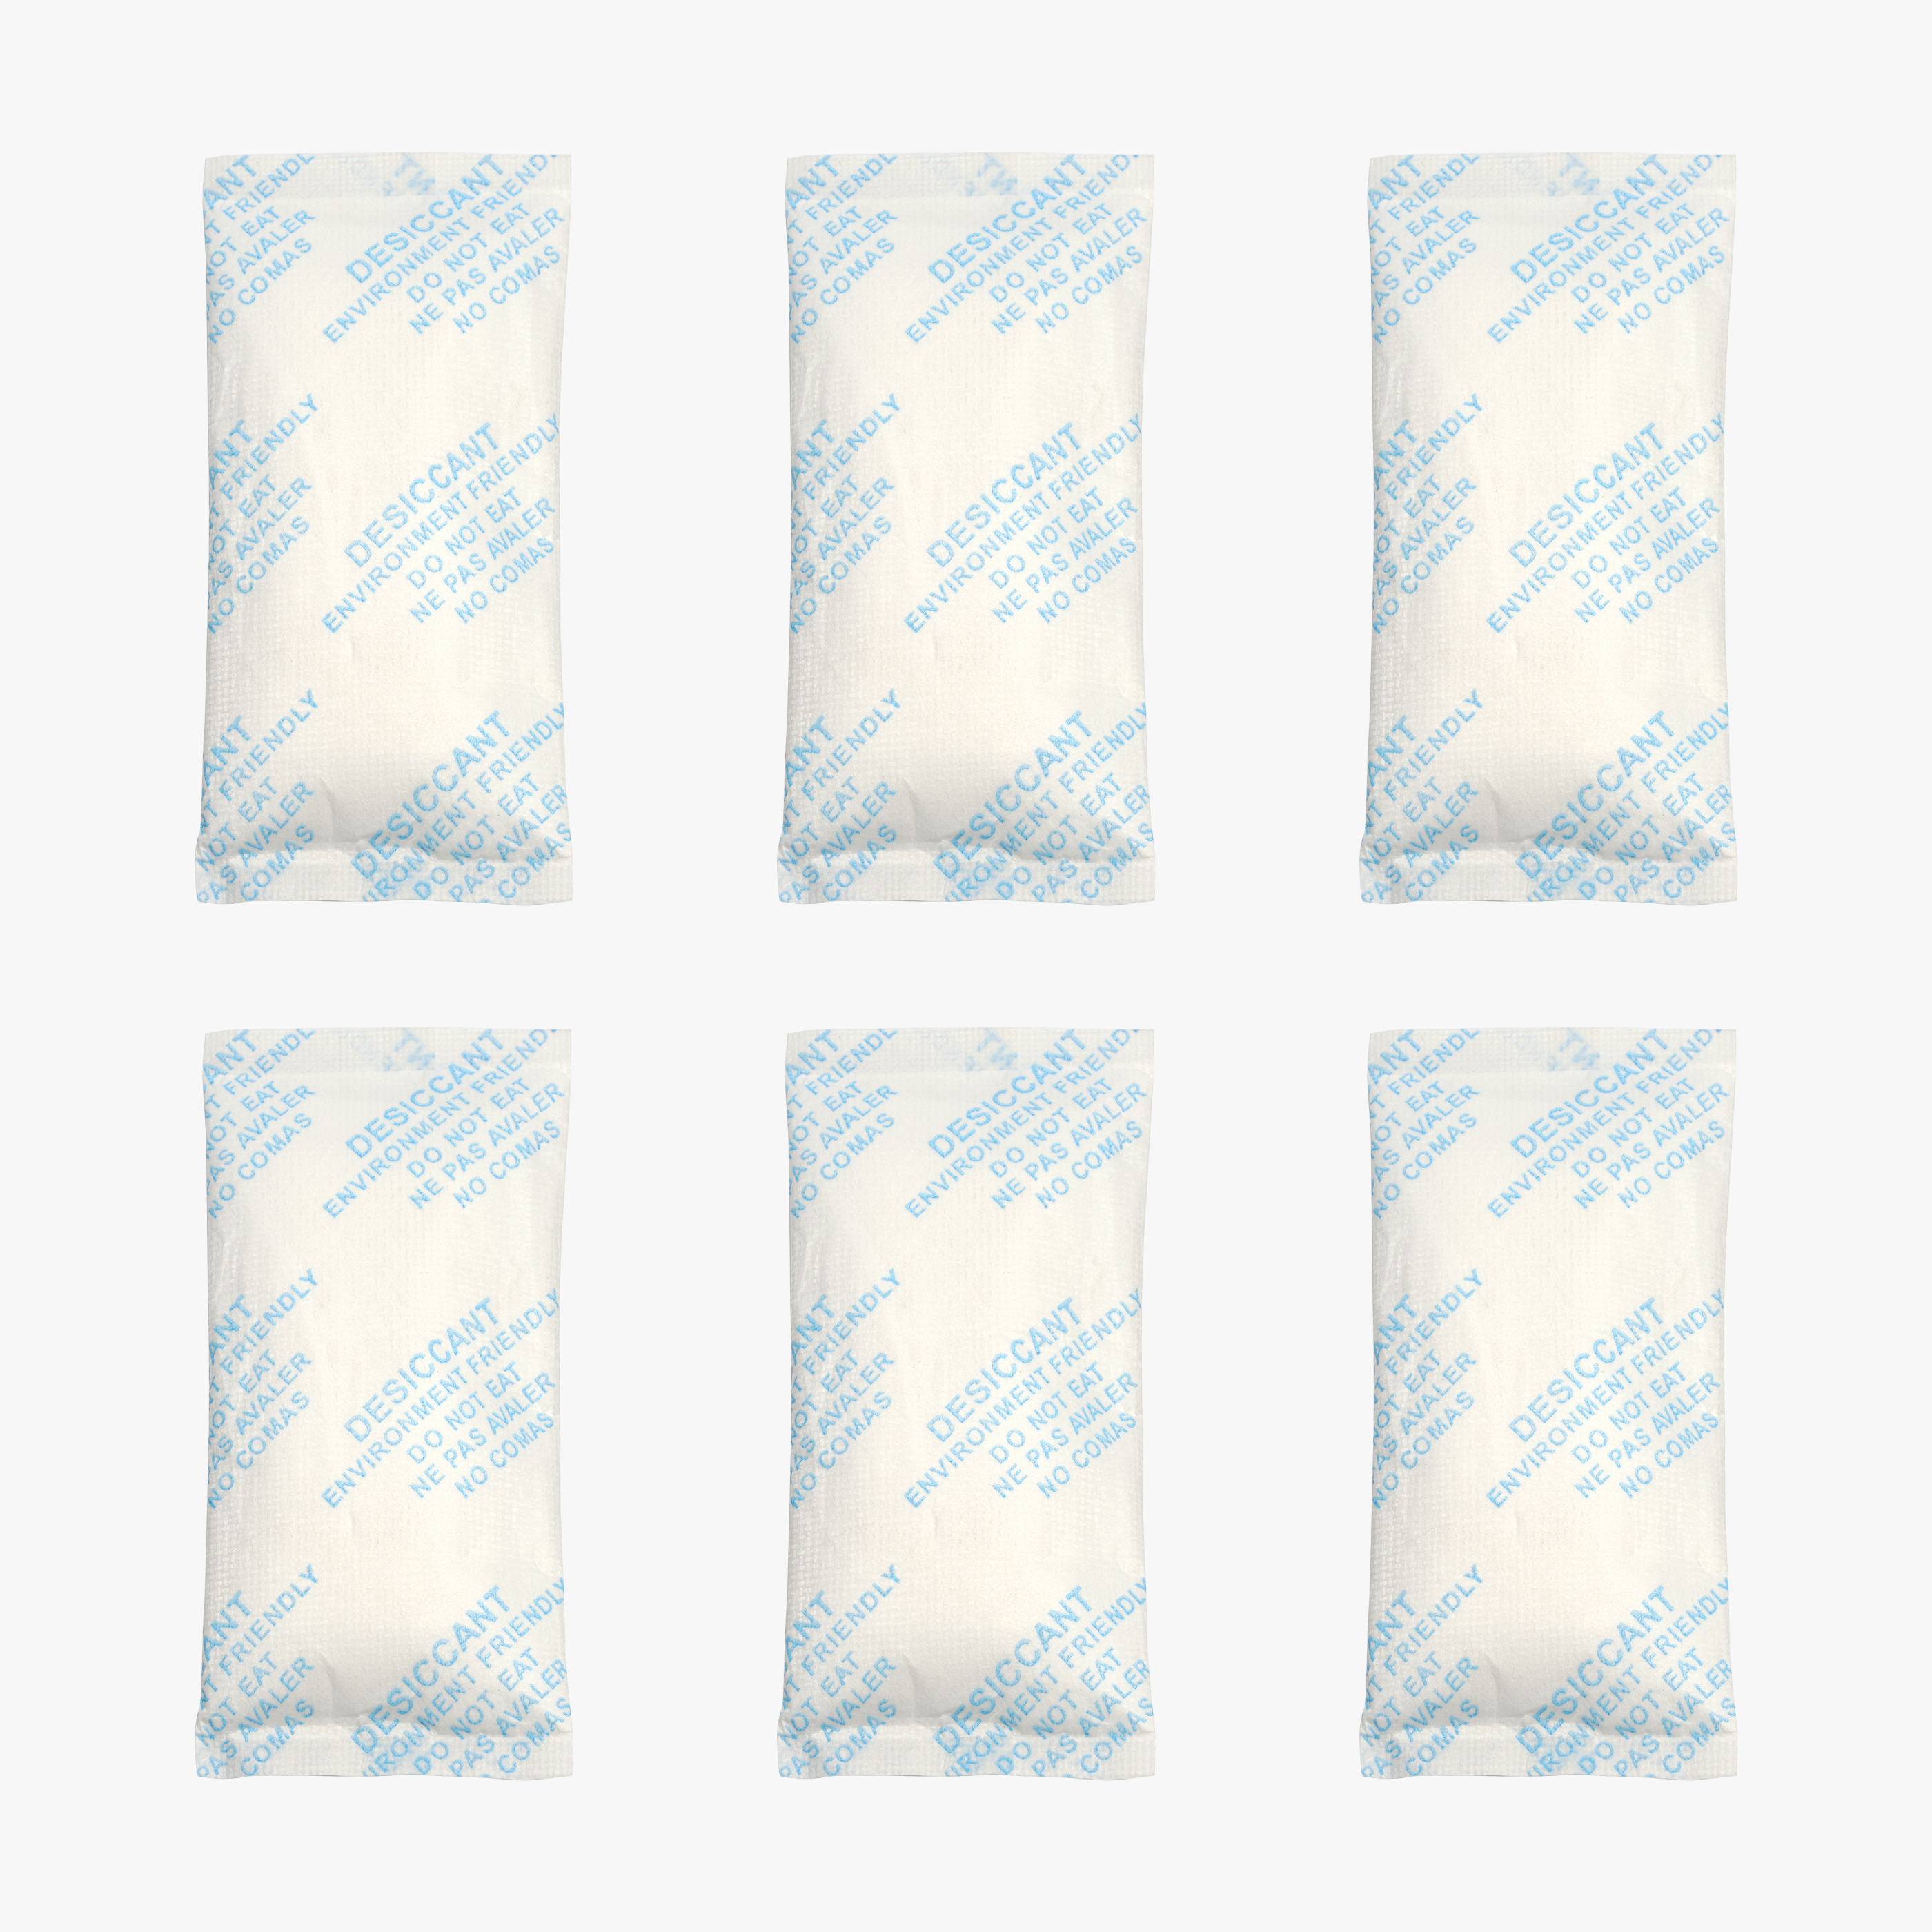
Desiccant Condition
Please note that this is not lubricant, but desiccant that has absorbed moisture. Do NOT apply it to bearings or rails, as it may damage the device.
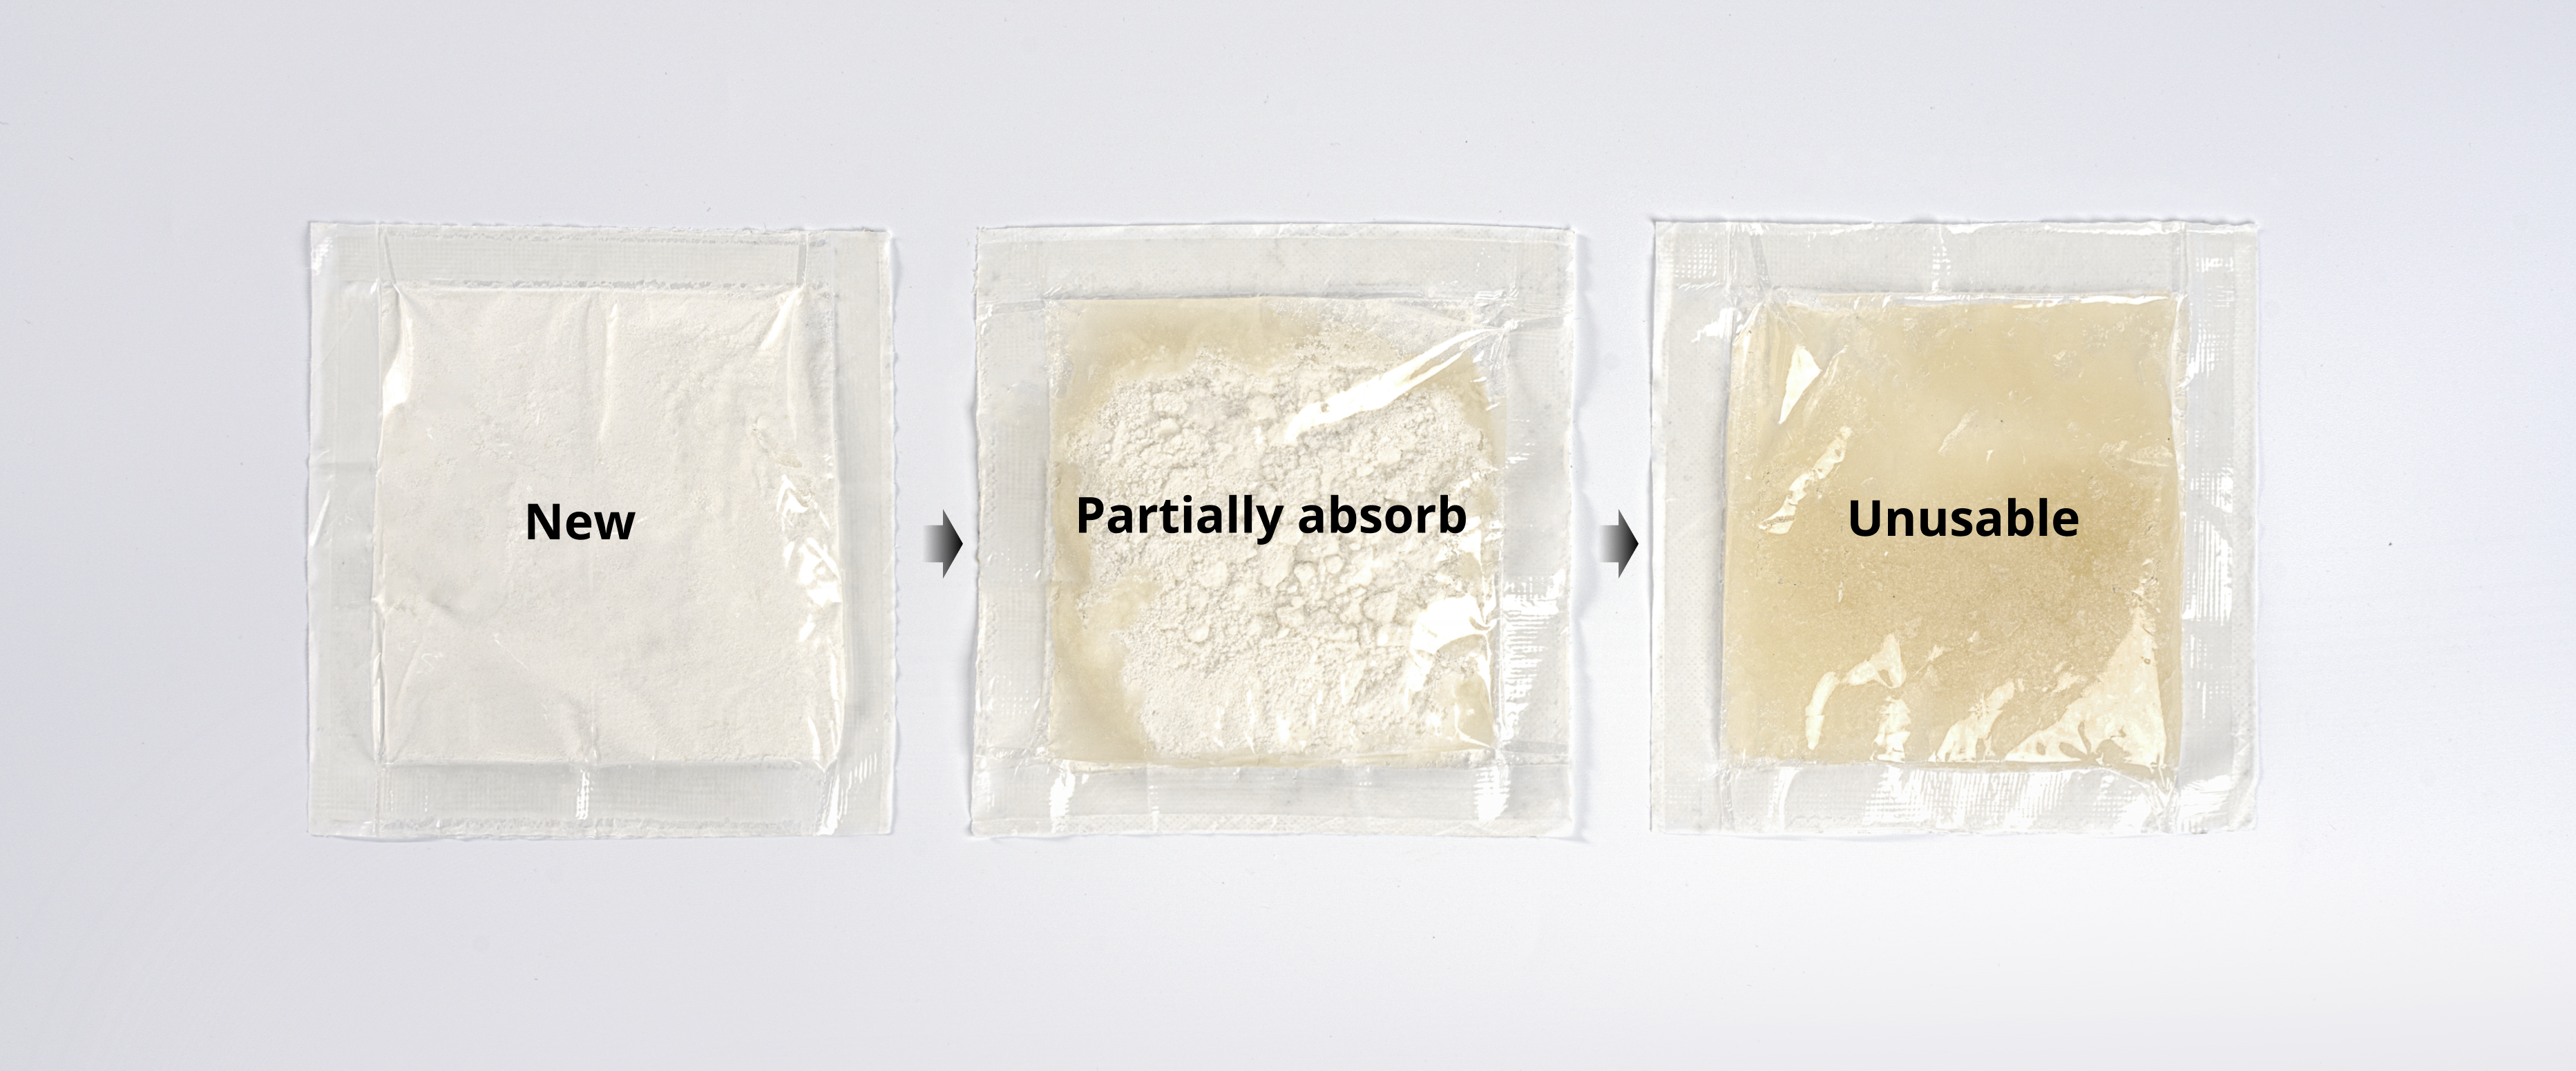
If the desiccant has expired, please dispose of it promptly.The following image (Fig. 1) shows the three conditions of the desiccant from left to right:
New (effective) condition
Partially moisture-absorbed (partially ineffective) condition
Fully moisture-absorbed (completely ineffective) condition
Notes:
- Before use, remove the outer package with printed instructions. After removing the package, the desiccant should appear in the new, non-moisture-absorbed condition shown on the left of Fig. 1 (New).
- It is recommended to check the desiccant status every two weeks and replace it immediately once it becomes ineffective.
- If not replaced for an extended period, the desiccant will lose its moisture-absorbing capability and will no longer provide effective protection for the filament.
- If the desiccant is not replaced for over 3 months, leakage may occur. In severe cases, this may cause short circuits or damage to internal circuits or electronic components inside the AMS.
End Notes
We hope this guide has provided clear and practical support.
If the issue remains unresolved, please submit a support ticket and include yourrecent printer logs and additional pictures or other details. Our technical team will review your requestand provide detailed assistance.
You can also visit Bambu AI,which can instantly answer common questions and provide you with operational guidance.